The AL Orange Help Center, all in one place.
Ask your question in your own words, or pick a guide below. Tap to open it; it stays put while you follow along.
The assistant only answers AL Orange technology questions.
Tap any guide below to open it. Tap again to close.
Which guide do I need?
Find your situation below and follow the guides in order. Green cards are things you can do yourself. Amber cards need the Tech team to do an admin step first.
I'm joining the board or received a new AL Orange email
Do it yourselfSet up your account on your computer and phone, then add the security app so you are never locked out.
I got a new phone
Do it yourselfReinstall Outlook and Authenticator on the new phone. If the old phone is already wiped or gone, email Tech first so we can reset your security methods.
Open: 2. iPhone 3. Authenticator
Something is broken or I can't sign in
Do it yourselfWrong password, locked account, mail missing on one device, full mailbox. Work the checklist top to bottom.
Open: 6. Fix sign-in problems
Two of us need to share one email address
Ask TechThat is a shared mailbox. Tech converts it in about 10 minutes, then it appears inside your own Outlook automatically. No shared passwords, ever.
Tech guide: 4. Convert a mailbox to shared
I'm handing my role email to my successor
Ask TechTech resets the password, signs your devices out, and hands the account over cleanly. Post your final documents first, then contact Tech.
Tech guide: 5. Reset password & hand off
None of these fit
Contact TechEmail technology@ALOrange.org with: what you were trying to do, the exact error message (a phone photo of the screen is perfect), and whether outlook.office.com works in a browser.
I'm setting up for a meeting
Do it yourselfConnecting a laptop to a screen or projector, or running the full Chapter meeting tech setup with mic and Zoom.
Set up Microsoft 365 on a laptop
This signs a member into their ALOrange.org account on a Windows or Mac laptop. The fastest, most reliable path is the web version first, then the desktop apps. The web version always works, even when the apps misbehave.
Open a browser and go to office.com
Use Edge or Chrome. Type office.com in the address bar and click Sign in at the top right. This page may also appear as Microsoft 365.com, which is the same thing.
Sign in with the @ALOrange.org email
Enter the full address, for example treasurer@ALOrange.org, then the password. If this is a brand-new or handed-off account, use the temporary password the Tech team provides, and the system will ask the member to create a new one.
Password rule of thumb: at least 12 characters, a phrase they will remember, written down somewhere safe at home.
Complete the security setup if prompted
A screen saying "More information required" means Microsoft wants a second sign-in method. Jump to Guide 3, set up Authenticator, then come back here.
Open Outlook on the web and send a test email
From office.com, click the app launcher (the grid of 9 dots, top left) and choose Outlook. Send a quick test message to technology@ALOrange.org so we know mail flows.
Add the account to the Outlook desktop app (optional but recommended)
Windows 11: press Start, type Outlook, and open it. Since April 2026 this opens the new Outlook by default. Click Settings (gear) › Accounts › Email accounts › Add account, enter the @ALOrange.org address, and sign in.
Mac: open Outlook from Applications (install from office.com › Install apps if missing), then Outlook menu › Settings › Accounts › +.
Check that shared mailboxes appear (if the member has one)
In the new Outlook and on the web, shared mailboxes the member belongs to (like Membership) show up automatically in the left folder list within about an hour of being added. No manual steps needed. If it has not appeared by the next day, see Guide 6.
Set up Outlook on an iPhone
Use the Outlook app, not the built-in Apple Mail app. Outlook handles AL Orange's security settings better, shows shared mailboxes, and includes the calendar. Apple Mail works too but causes more support calls.
Install Microsoft Outlook from the App Store
Open the App Store, search Microsoft Outlook, and tap Get. The icon is a blue envelope with an O. It is free. If the App Store asks for an Apple ID password, that is the member's personal Apple password, not the AL Orange one.
Open Outlook and add the AL Orange account
First launch: type the @ALOrange.org address and tap Add account. If Outlook already has a personal account on it: tap the profile picture (top left) › gear ⚙ › Add email account.
Sign in and approve the security prompt
Enter the password. If Authenticator is already set up, a number appears on screen; type that number into the Authenticator prompt on the same phone or approve it. If MFA is not set up yet, the phone will walk through it now (see Guide 3).
Turn on notifications and check the calendar
Allow notifications when asked so board emails are not missed. Tap the calendar icon at the bottom to confirm AL Orange events appear.
Add a shared mailbox if the member uses one
Tap profile photo › gear ⚙ › Add email account › Add a shared mailbox, then type the shared address, for example membership@ALOrange.org. It appears as a second account in the app.
Set up Microsoft Authenticator (MFA)
Multifactor authentication (MFA) is the second lock on the account. Microsoft requires it, and it is the single most valuable security step a member can take. Have your phone in hand before starting.
Install Microsoft Authenticator on the phone
App Store (iPhone) or Google Play (Android), search Microsoft Authenticator. The icon is a blue padlock. Free. Beware of look-alike apps that charge money; the real one is published by Microsoft Corporation.
On the laptop, go to the security setup page
In a browser, visit aka.ms/mfasetup and sign in with the AL Orange account. If the account is new, Microsoft shows this page automatically with the message "More information required."
Scan the QR code with the Authenticator app
On the phone: open Authenticator, tap + › Work or school account › Scan a QR code, and point the camera at the square code on the laptop screen. Allow notifications when asked.
Approve the test with number matching
The laptop shows a two-digit number. The phone pops up a prompt asking for that number. Type it on the phone and tap Yes. This number-matching step is how all approvals work now, so explain it to the member: only type the number if you are the one signing in.
Add a backup method
On the same page, click Add sign-in method › Phone and enter the member's cell number for text codes. If the member ever gets a new phone, this backup avoids a lockout.
Connect a second screen or projector
Use this when you plug a laptop into a second monitor, a TV, or a projector (for example, at Chapter meetings). The quickest way is the keyboard shortcut. The longer way through Settings does the same thing if you prefer menus.
Plug in the screen first
Connect the HDMI (or USB-C) cable from the laptop to the TV or projector, and make sure the TV or projector is turned on and set to the matching input. Then turn the laptop on.
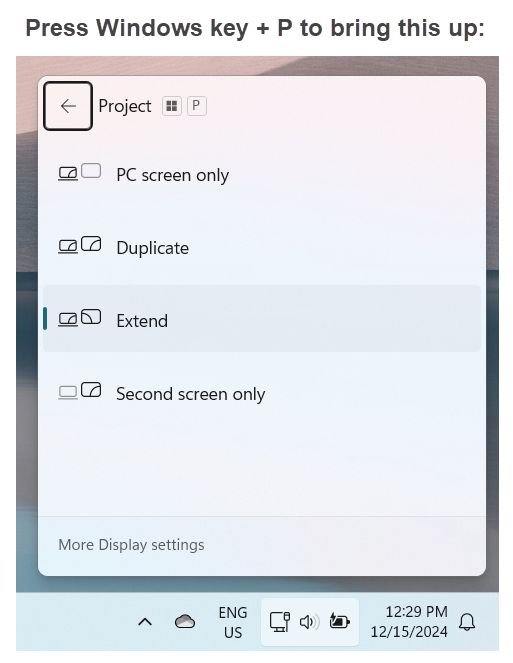
Fast way: press the Windows key and the letter P together
A small panel slides in from the right with four choices. Pick the one you want:
Duplicate shows the same thing on both screens (best for presentations). Extend makes the second screen extra space. PC screen only or Second screen only use just one.
Menu way: right-click the desktop, choose Display settings
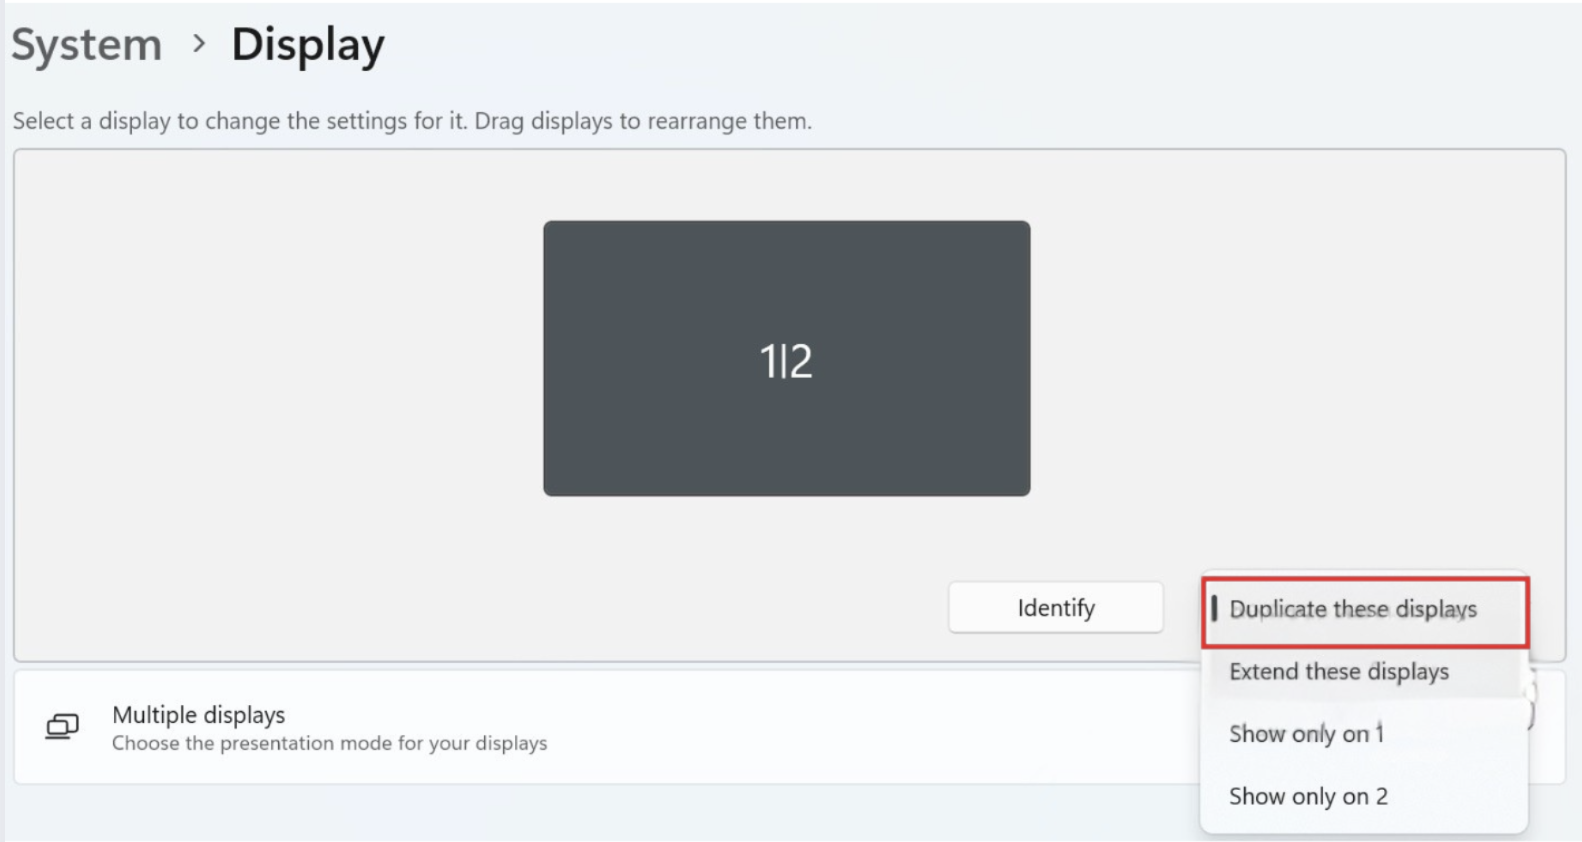
If you would rather use menus: right-click an empty part of the desktop and click Display settings. Scroll to Multiple displays, open the drop-down, and choose Duplicate these displays.
Chapter meeting tech setup
A start-to-finish checklist for setting up the laptop, screens, microphone, and Zoom at a Chapter meeting. Work top to bottom on meeting day. Tap "Walk me through it" to go one step at a time at the podium.
Before the day: prepare files and equipment
The assigned team member uploads the presentations to the Tech Microsoft Team and emails a copy to the Tech Chair. Make sure the chapter laptops are updated and charged.
Day before: review and confirm
Read through this checklist. Confirm the Zoom link and who is Host and Co-host.
Set up the laptop and podium
Pull the podium out from the wall. Place the laptop on it and plug in HDMI, the power cord, and the laptop camera. Turn on the mouse and laptop (the laptop password is taped next to the trackpad). If you are using a cell phone for audio, turn the podium laptop sound OFF.
Turn on the TV screens
Turn on the Samsung and LG screens. For the LG, if it does not turn on, point the remote at the logo from the back of the room. If the LG shows "No Signal": choose Open Input List, then Outside Cabinet / HDMI1.
Set up the microphone and sound
Plug the microphone into "Mic 2" on the wall. Adjust the mic #2 volume on the University Sound 35-Watt mixer amplifier in the cabinet.
Open the presentation and join Zoom
Open the presentation on the main screen. Keep a backup in the Tech Microsoft Team and the Tech Lead's email (notify and reconfirm). Call into Zoom as Host. If the President is Host, set the leader's podium laptop as Co-host.
One sound source only, then record
Only one device should have sound ON (the cell phone). If the President calls in by phone, set it to audio only and turn on Do Not Disturb to avoid notification sounds. Then start Zoom recording and save to the cloud.
Reset a password & hand off an account
Use this when a role email (like a Director or President account) passes from the outgoing member to the incoming one. The goal: the new member gets in cleanly, and the outgoing member's devices and security methods are fully disconnected.
Confirm the outgoing member is finished
The outgoing member posts their final documents and sends any pending emails first. Do not reset until they confirm they are done, or unsaved work could be lost.
Reset the password
In admin.microsoft.com › Users › Active users, select the account and click Reset password (the key icon). Uncheck auto-generate and set a temporary password you can hand to the new member. Keep "Require this user to change their password when they first sign in" checked.
Sign the old member out of every device
On the same user pane, Account tab › Sign out of all sessions. This kicks the account off the outgoing member's laptop, phone, and browsers within about an hour.
Clear the old MFA methods
Go to entra.microsoft.com › Users › All users › select the account › Authentication methods. Click Require re-register multifactor authentication, and delete the outgoing member's phone number and Authenticator entries. Otherwise sign-in approvals would still go to the outgoing member's phone.
Update the display name
On the user pane, Manage contact information: change the first and last name to the incoming member, so recipients see who is really writing. The email address itself stays the same, which keeps history and group memberships intact.
Fix common sign-in & mailbox problems
Work top to bottom. Most "my email is broken" reports are one of these five things. The web version at outlook.office.com is the truth test: if mail works there, the account is fine and the problem is the device.
"Password is incorrect"
First check the address: members often sign in with a personal Microsoft account (Hotmail, Outlook.com) by mistake. Confirm the screen shows the @ALOrange.org address. Still failing? Reset it as admin (Guide 5, step 2) and have them sign in fresh.
"Account is locked" or too many attempts
Wait 15 minutes (the lockout clears itself), then reset the password as admin. While waiting, check Sign-in logs in entra.microsoft.com to be sure the failed attempts came from the member and not an attacker. Unfamiliar countries or repeated nightly attempts mean: reset password, require MFA re-registration, and report to Tech.
MFA prompts go to an old phone
Member got a new phone and Authenticator went with the old one. As admin: entra.microsoft.com › Users › [member] › Authentication methods › Require re-register MFA. Then run Guide 3 on the new phone.
Mail works on the web but not in the app
New Outlook (Windows): Settings ⚙ › Accounts › select the account › Remove, restart Outlook, add it back (Guide 1, step 5). iPhone: in the Outlook app, profile photo › gear › tap the account › Delete account, then re-add (Guide 2). Removing and re-adding fixes 9 of 10 app-side problems.
"Mailbox is full" or mail stopped arriving
Check usage at outlook.office.com › Settings ⚙ › General › Storage. Empty Deleted Items and Junk first, then sort the inbox by size and remove old large attachments. Also check that no forwarding rule is silently redirecting mail: Settings › Mail › Forwarding and Rules. Unexpected forwarding rules are a compromise red flag; report them to Tech.
A shared mailbox is missing
Confirm the member is listed under Teams & groups › Shared mailboxes › [mailbox] › Members in the admin center. If yes, give it an hour; sync is not instant. On the web, the member can also right-click Folders › Add shared folder or mailbox and type the address to attach it immediately.
Outlook is slow on an older laptop
Skip the installed Outlook app and use Outlook on the web instead: open a browser and go to outlook.office.com, then sign in. The web version is lighter and runs smoothly on older machines, with no setup to break.
outlook.office.com first, every time. Account-level issues (password, MFA, storage, rules) show up there. Device-level issues do not.Create a new shared mailbox from scratch
Use this to make a brand-new shared address (like support@ALOrange.org) that several members manage together. If instead you want to turn someone's existing mailbox into a shared one, use Guide 4. A shared mailbox needs no license under 50 GB, and nobody signs into it directly; members reach it from inside their own Outlook.
Open Shared mailboxes in the admin center
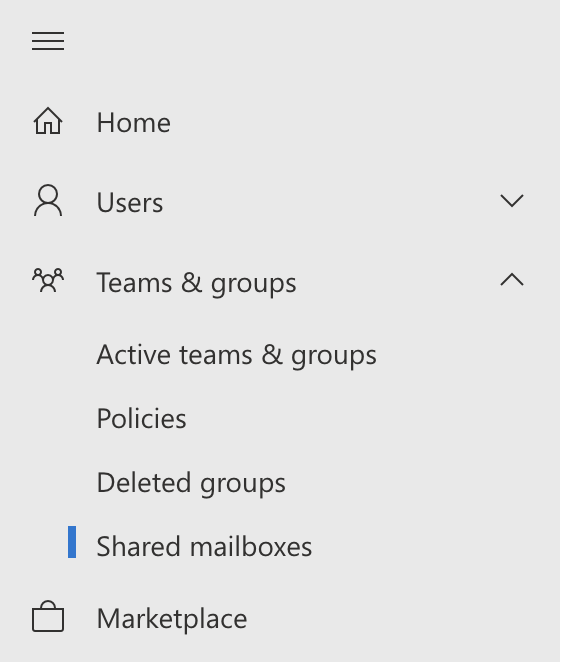
Sign in to admin.microsoft.com with the Tech admin account. In the left menu, click Teams & groups, then Shared mailboxes. If you do not see it, click Show all first.
Add the shared mailbox
Click + Add a shared mailbox. Enter a Name (for example, Customer Support) and an Email address at the ALOrange.org domain (for example, support@ALOrange.org). Click Save changes. The mailbox is created in a minute or two.
Open the new mailbox and start adding members
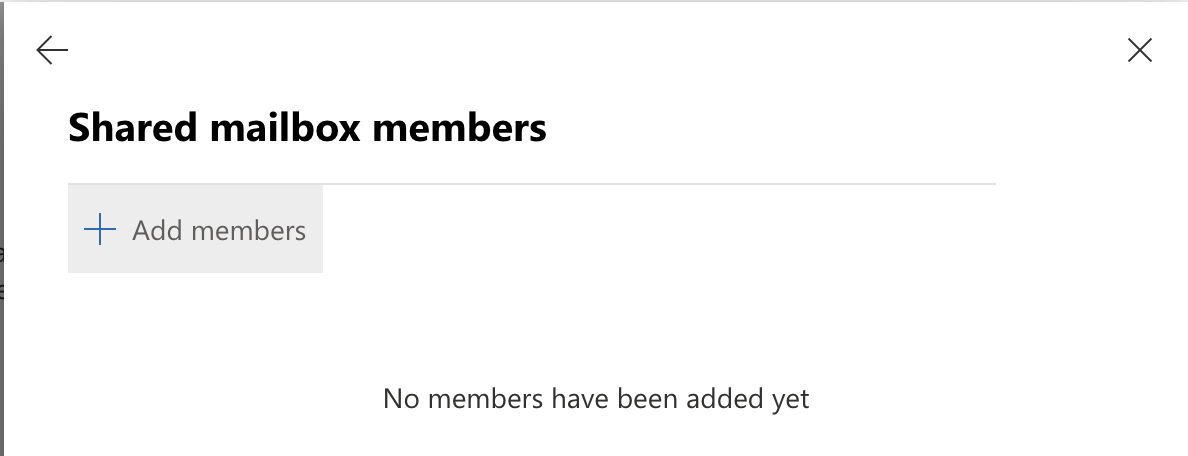
Click the new mailbox in the list to open its detail pane. Under Members, click Edit. A new mailbox shows "No members have been added yet" until you add the first person.
Search for and select each member
Click + Add members, type a name or email in the search box, and check the box next to each person you want. Click Add when done. Members can only be added from within AL Orange's organization, not personal outside emails.
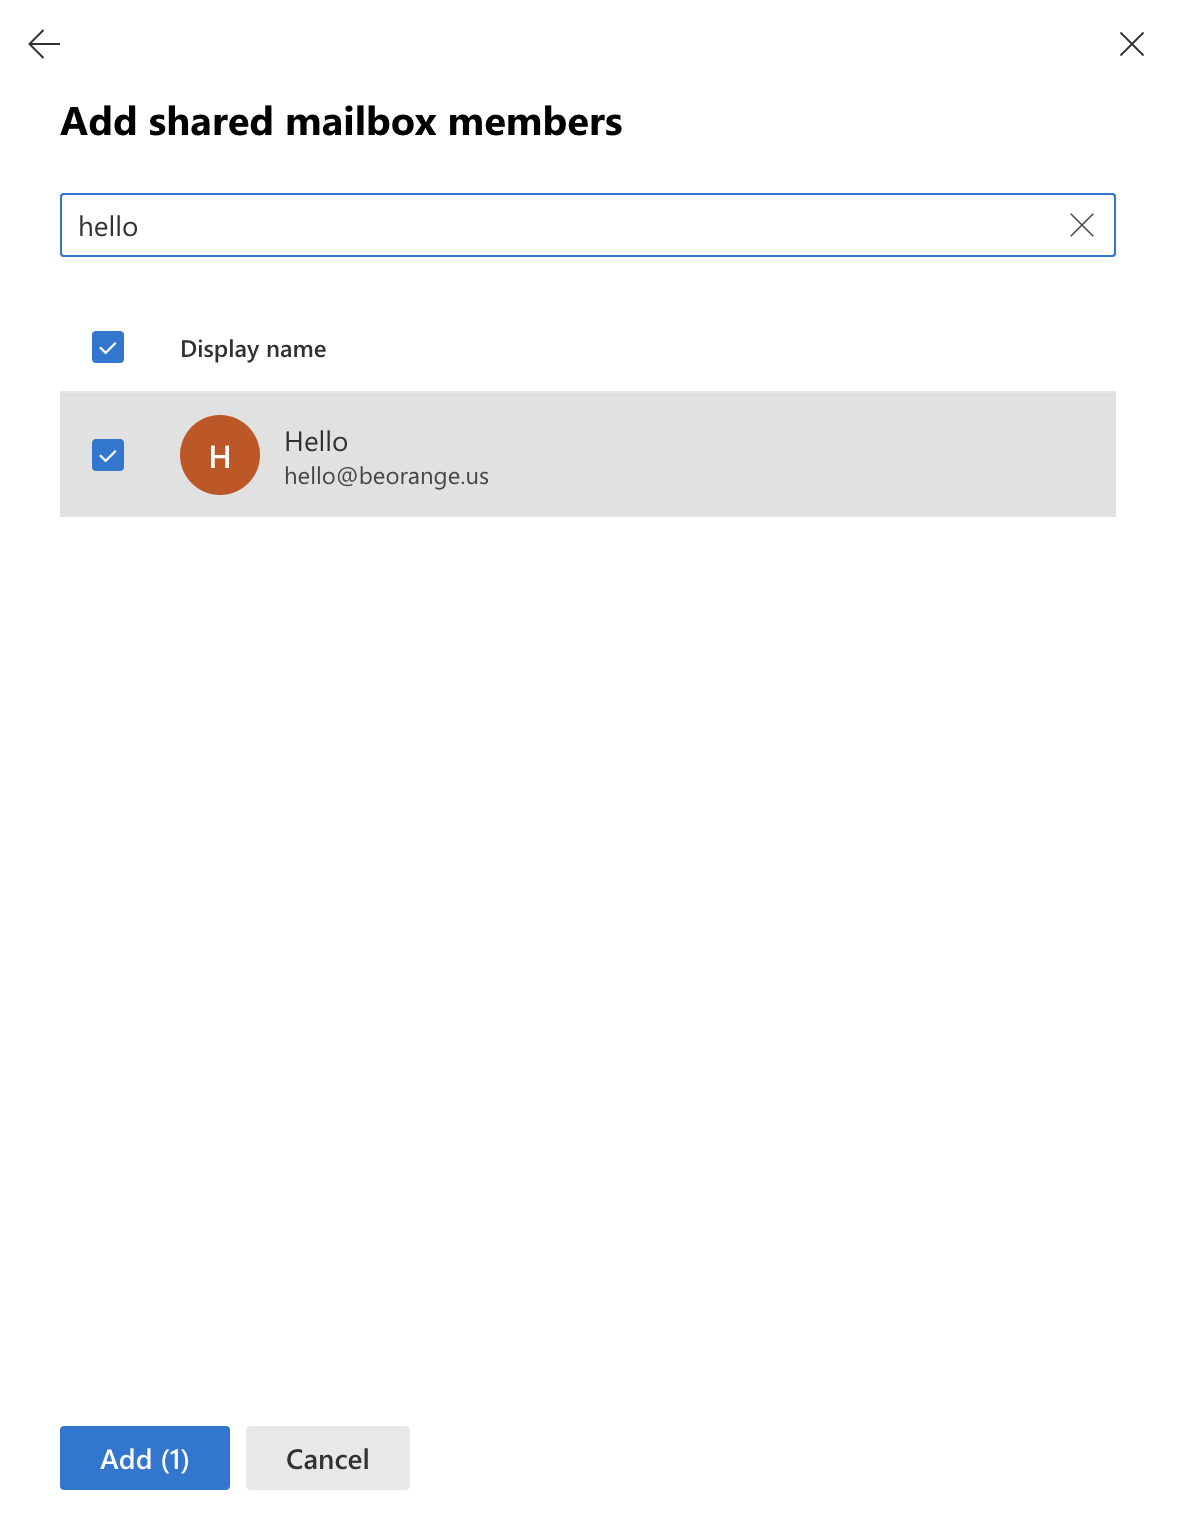
Check permissions in the detail pane
Back on the mailbox detail pane, the right side lists the permission types. Adding someone as a member normally grants Read and manage and Send as. If a member also needs Send on behalf, set it under the matching link here. The pane also lets you set Aliases, Email forwarding, Automatic replies, and Sent items behavior.
Have a member confirm it appears in Outlook
The shared mailbox shows up automatically in each member's Outlook (new Outlook and on the web) within about an hour, in the left folder list. To send from it: New mail, then From, and pick the shared address. On the web, a member can also open it directly with their profile picture, then Open another mailbox, then the shared address. If it has not appeared by the next day, see Guide 6.
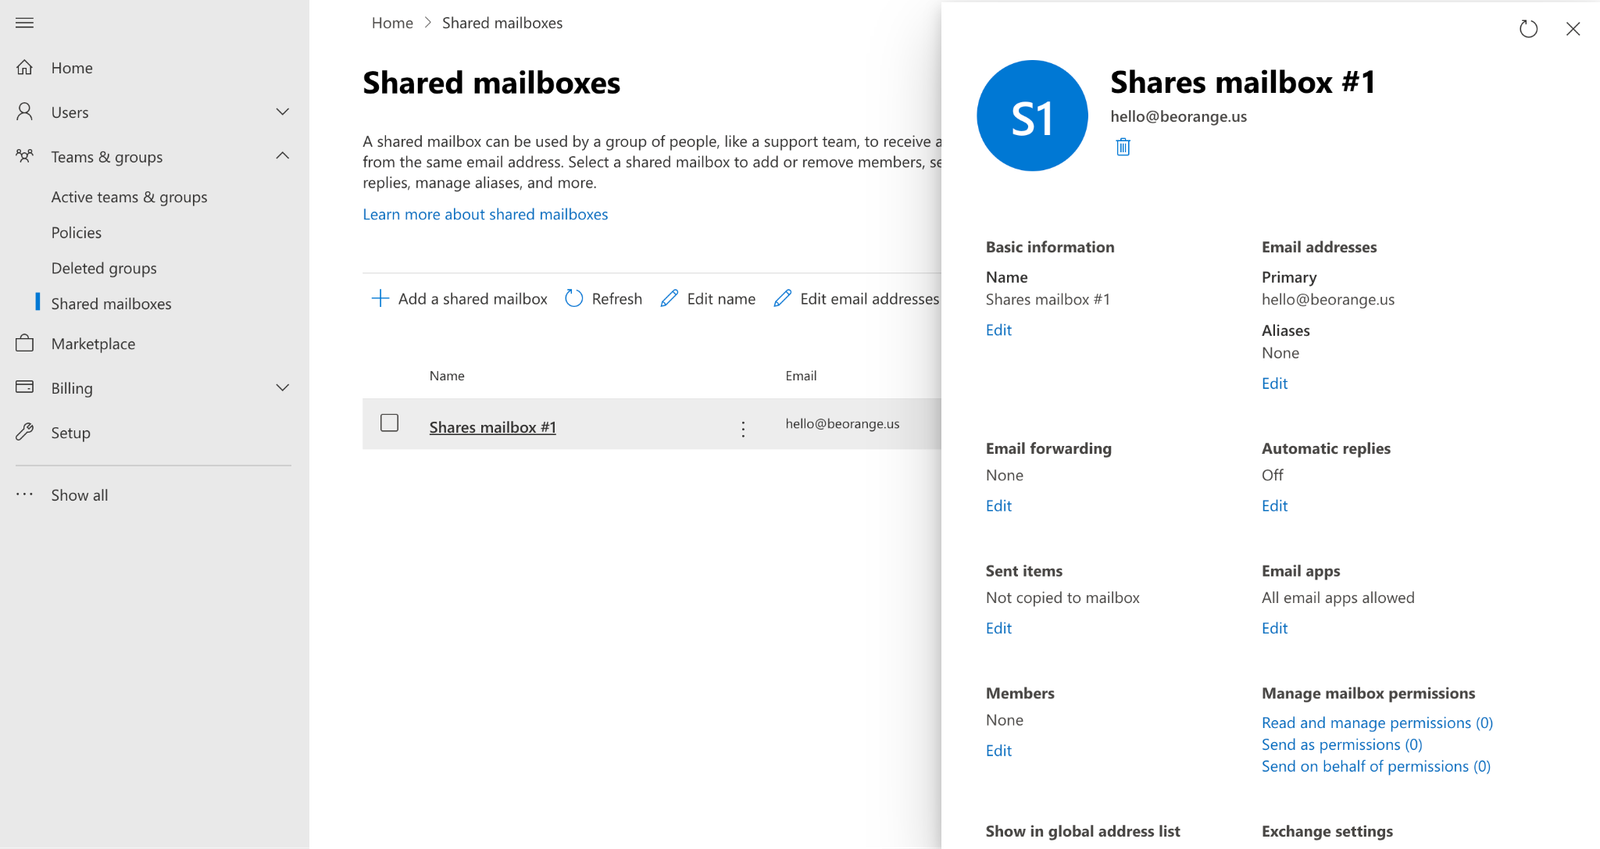
Add, reset, and remove users
The three everyday account tasks in the Microsoft 365 admin center: creating a new user, resetting a password, and removing someone who has left. All three start at admin.microsoft.com, then Users, then Active users.

Add a new user
Open Active users and click Add a user
Sign in to admin.microsoft.com, go to Users › Active users, and click + Add a user.
Enter the basics
Fill in first name, last name, display name, and username (the part before @ALOrange.org). Choose to auto-generate a password or set one, and check "Require this user to change their password when they first sign in."
Assign a license, then finish
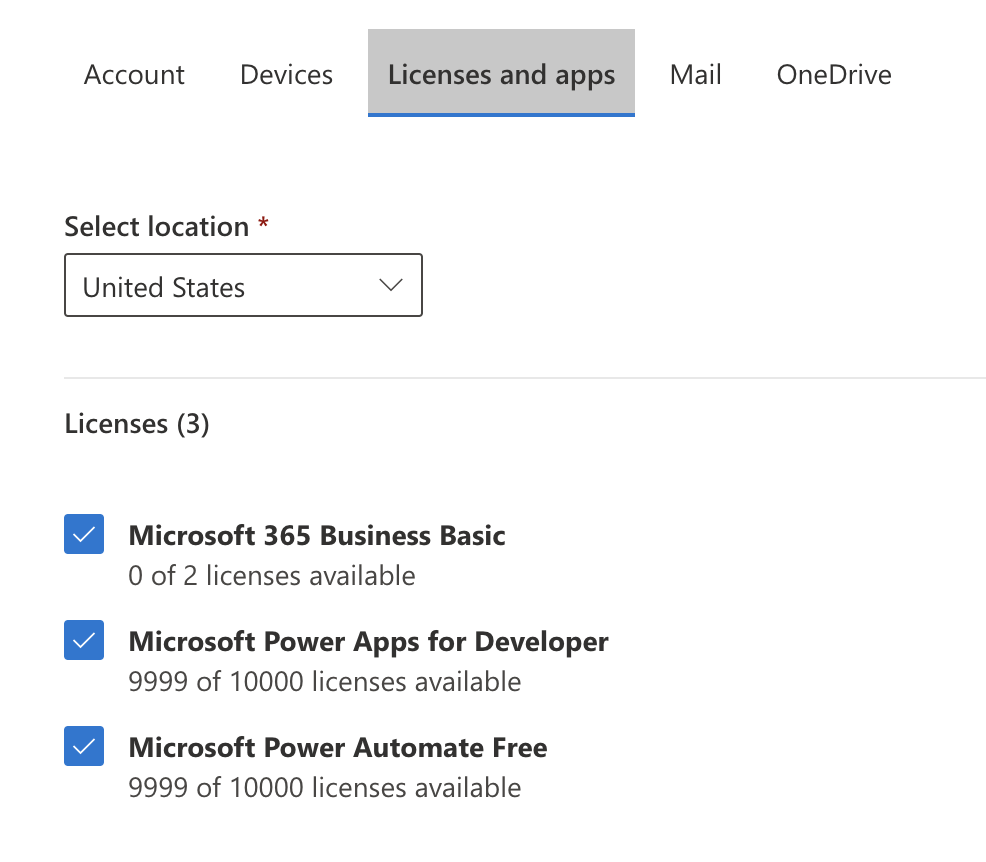
On the next steps, assign the appropriate license (so the account can use email) and any role. Review and click Add. For a nonprofit Business Basic license, see the FAQ on keeping licenses in active use.
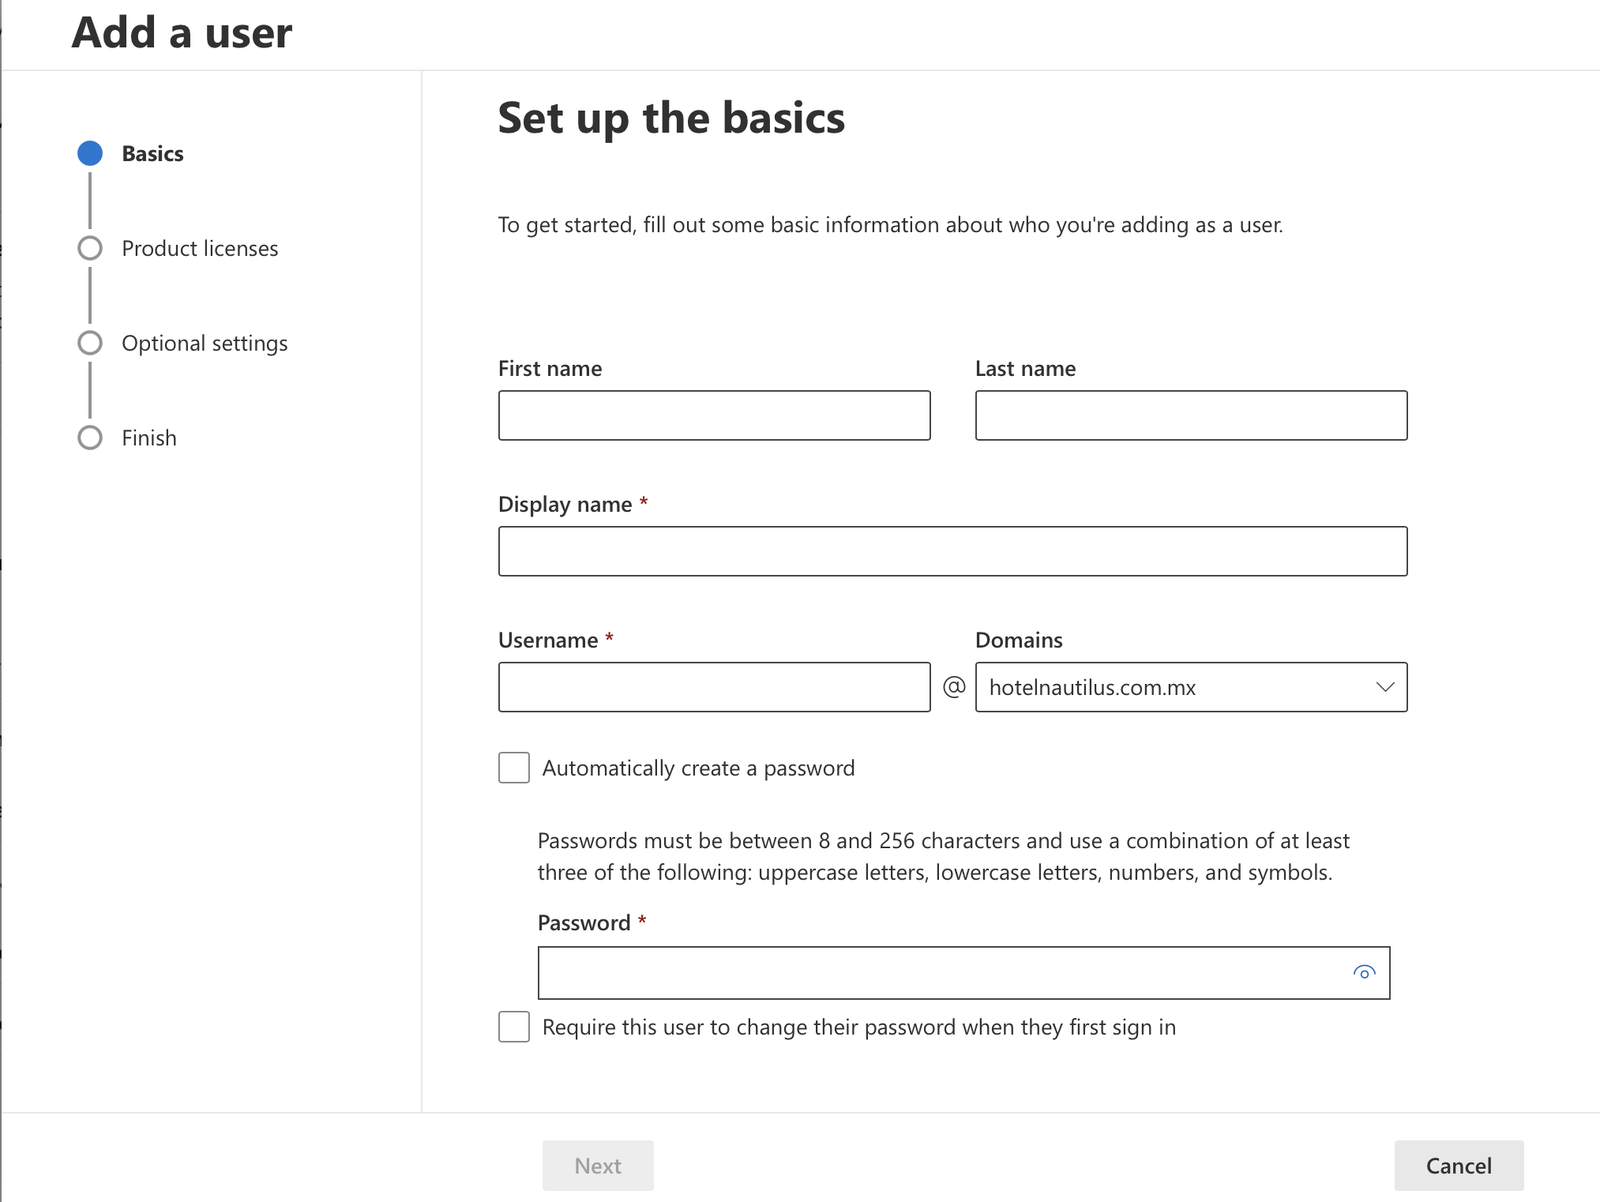
Reset a password
Select the user and click Reset password
In Active users, click the person's name, then Reset password (the key icon). Either auto-generate and send to an alternate email, or set a custom temporary password and share it securely (by phone, not in the same email as their username).
Remove a user who has left
Select the user and click Delete user
In Active users, click the person's name, then Delete user. You will be asked what to do with their data.
Decide what happens to their email and files
You can keep the data by assigning their OneDrive and email to another person, or delete it. If unsure, keep it. Deleted users are recoverable for 30 days.

Transfer a user with Entra (reset, re-register MFA, revoke)
These are the security steps in the Microsoft Entra admin center that fully disconnect an outgoing person from an account. Use them together with Guide 5 when a role passes to a new member. You need at least the Authentication Administrator role.
Sign in to Entra and open the user
Go to entra.microsoft.com and sign in. Open Entra ID › Users › All users and click the person you are transferring.
Reset the password
Open Authentication methods, then Reset password. Entra assigns a temporary password the new member must change at next sign-in.
Require MFA re-registration
Still in Authentication methods, click Require re-register MFA. This removes the outgoing person's phone numbers, Microsoft Authenticator apps, and software tokens, so the next sign-in prompts the new member to set up their own. Without this, approvals would still go to the old phone.
Revoke MFA sessions
Click Revoke MFA sessions. This clears remembered sign-ins so MFA is required again on the next attempt, on every device.
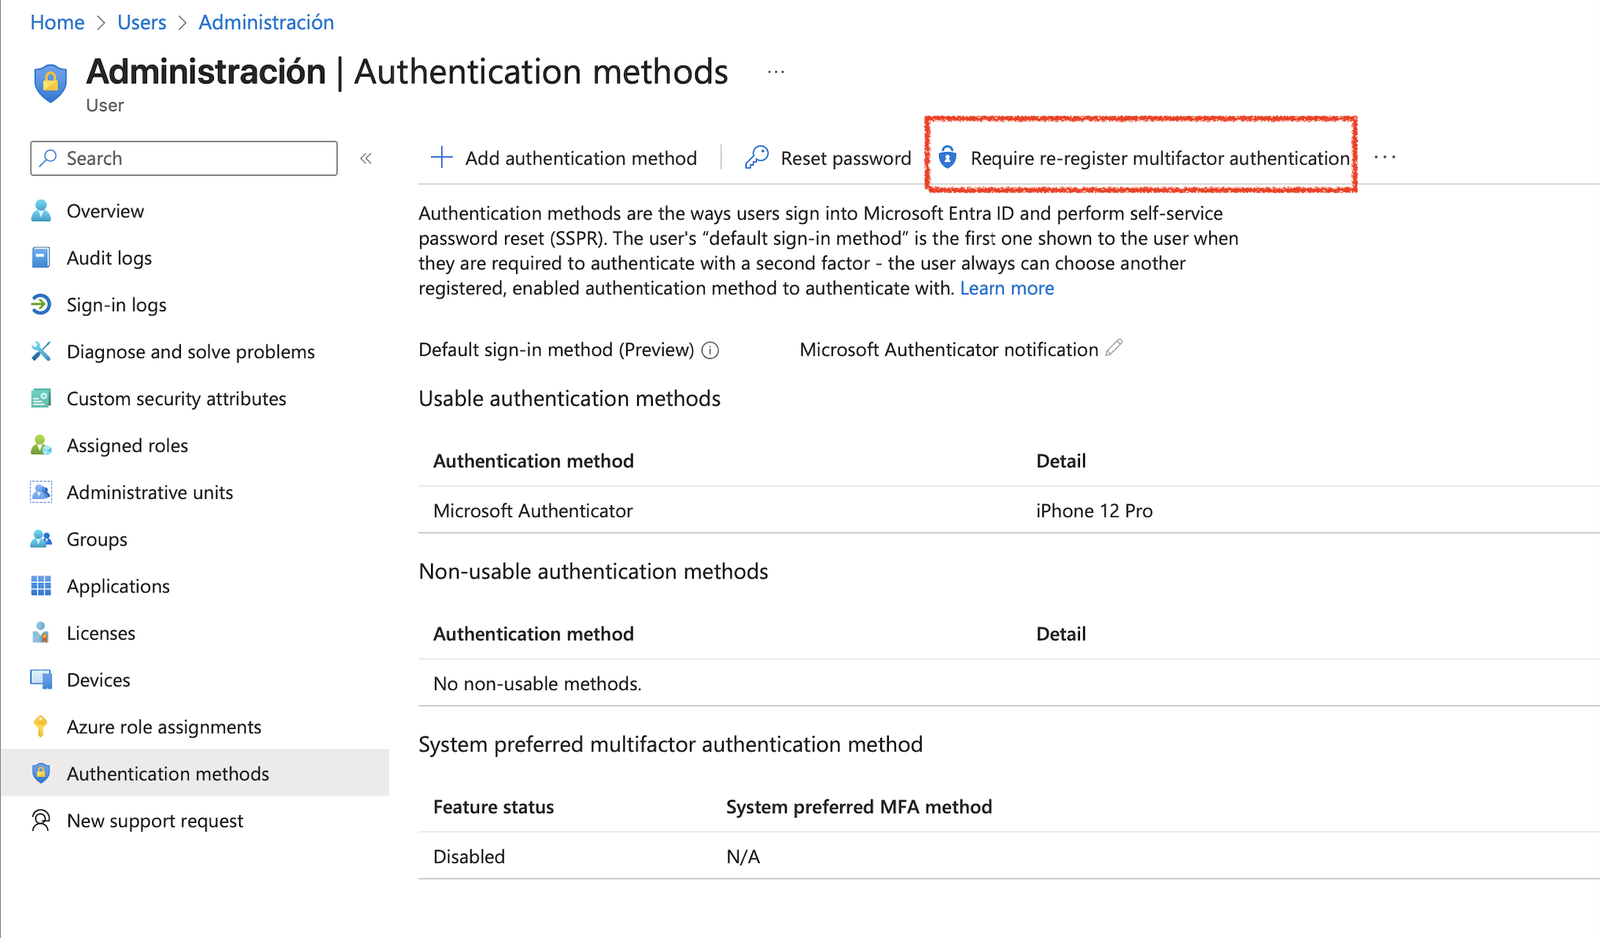
Restrict a former board member's access
Use this when a board member steps down but should keep their personal AL Orange email, while losing access to Board-only material in SharePoint, Teams, and groups. The goal is to trim access without deleting the account. If the role and its email pass to a successor instead, use Guide 5 or Guide 11.
Trim their license to email only
In admin.microsoft.com › Users › Active users, open the person, go to Licenses and apps, and turn off apps they no longer need, keeping Exchange Online so their mailbox still works. Save.
Remove them from the Board SharePoint site
Open the SharePoint site used for Board materials. Go to Membership, then Members, find the person, and choose Remove as member.
Remove them from Board Teams
In the Teams admin center, go to Teams › Manage teams, open the relevant Board team, click Members, and remove the former member.
Clean up group and distribution-list memberships
Back in the admin center, view the person's group memberships and remove them from any Board-specific groups or distribution lists they should no longer be part of.
Audit other shared resources
Check OneDrive shares, Planner, and any other app where Board data lives, and adjust their access so they cannot reach sensitive Board operations.
Tell the person, and write it down
Email the former member a plain summary of what they can and cannot access now, and who to contact with questions. Keep a short log of the changes you made, for governance and so the next Tech volunteer has a record.
FAQ & quick references
I see a different Outlook than the screenshots online. Why?
Can I set up from home or while traveling?
Do shared mailboxes cost a license?
Should members ever share a password instead?
What do members do if something breaks?
outlook.office.com works in a browser.